A Simple Guide to Safely Using a Male Catheter at Home
Learning to use a male catheter at home can feel a little daunting at first, but with clear guidance, it can quickly become a simple and manageable part of your routine. This guide is designed to give you confidence by breaking down the entire process.
Using a male catheter at home for the first time can seem intimidating, but with the right guidance and preparation, it can become a manageable part of your daily routine. This guide provides a detailed, step-by-step process for using an intermittent catheter, which is the most common type for self-catheterization at home. It is crucial to remember that this guide is for informational purposes only. You should always follow the specific instructions provided by your healthcare provider, as your needs may vary.
Step-by-Step Guide to Self-Catheterization
The process can be broken down into three main phases: preparation, insertion, and removal. Taking a calm and methodical approach to each phase is key to ensuring safety and comfort.
Phase 1: Preparation and Gathering Supplies
Before you begin, proper preparation is essential to prevent infection and make the process as smooth as possible. You don't want to be searching for an item midway through the procedure.
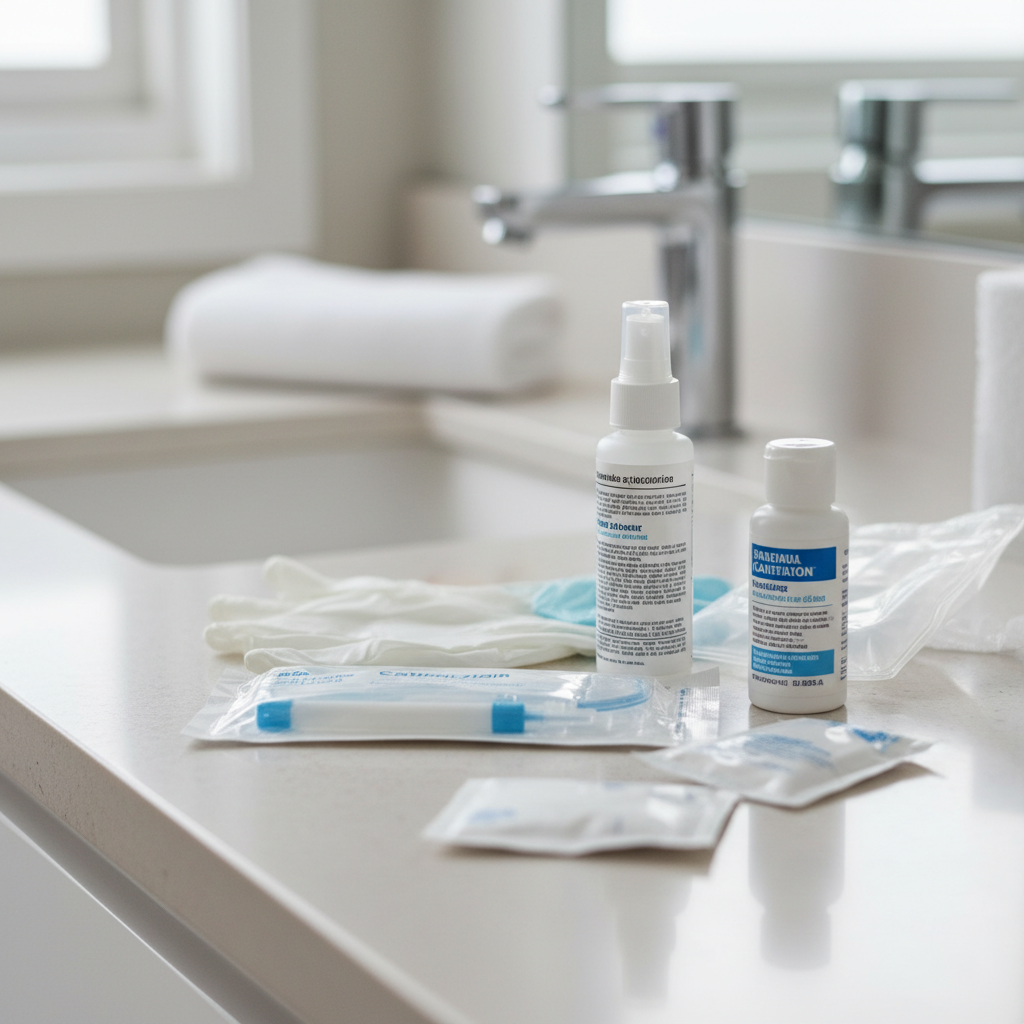
- Gather All Necessary Supplies: Find a clean, well-lit space, typically the bathroom. Lay out all your supplies on a clean surface or towel. You will need:
- A new, sterile catheter of the correct size (French size) prescribed by your doctor.
- Water-soluble lubricating jelly (many catheters come pre-lubricated).
- Antiseptic wipes or soap and water.
- A container to collect urine if you are not positioned over a toilet.
- Clean towels and a washcloth.
- A small mirror can be helpful for the first few times.
- Wash Your Hands Thoroughly: This is one of the most critical steps in preventing urinary tract infections (UTIs). Wash your hands with soap and warm water for at least 20 seconds, making sure to clean under your fingernails and between your fingers. Dry them completely with a clean towel.
- Prepare the Genital Area: If possible, wash the penis with soap and water. If not, use an antiseptic wipe. If you are uncircumcised, gently retract the foreskin first. Clean the head of the penis using a circular motion, starting at the urethral opening (the hole at the tip) and moving outward. Use a fresh part of the wipe or washcloth for each circle to avoid reintroducing bacteria.
- Prepare the Catheter: If your catheter is not pre-lubricated, open the lubricating jelly and apply a generous amount to the first 2-4 inches of the catheter tip. This ensures a smoother and more comfortable insertion. Do not let the lubricated tip touch any other surfaces to keep it sterile.
Phase 2: Inserting the Catheter
This phase requires a steady hand and relaxation. Tensing your muscles can make insertion more difficult.
- Get into a Comfortable Position: You can perform catheterization while sitting on the toilet, standing over it, or sitting in a chair. Find the position that works best for you and provides the most stability and control.
- Hold the Penis Correctly: Gently hold the penis with your non-dominant hand. Straighten it and hold it at a 45-degree angle away from your stomach. This position helps to straighten the urethra, making it easier for the catheter to pass through.
- Slowly Insert the Catheter: With your dominant hand, take the lubricated catheter and slowly insert the tip into the urethral opening. Gently and steadily advance the catheter into the urethra. Do not force it. It should move forward without significant pain, although you will feel some pressure.
- Navigate Past the Sphincter Muscle: You will likely feel some resistance as the catheter reaches the sphincter muscle at the base of the bladder. This is normal. Take a deep breath, try to relax your pelvic muscles (as if you were trying to urinate), and apply gentle, steady pressure. The muscle should relax and allow the catheter to pass into the bladder.
- Confirm Placement and Drain the Bladder: Once urine begins to flow, you know you have reached the bladder. Advance the catheter about one more inch to ensure it is fully in place. Let the urine drain completely into the toilet or the collection container. This may take a few minutes.
Phase 3: Removal and Cleanup
Proper removal is just as important as insertion to ensure comfort and hygiene.
- Ensure the Bladder is Empty: Once the flow of urine has stopped, you can slowly begin to withdraw the catheter. To make sure the bladder is completely empty, you can try coughing gently or applying light pressure on your lower abdomen. Sometimes, a little more urine will drain out as you slowly remove the tube.
- Withdraw the Catheter Slowly: Remove the catheter in a single, smooth, and slow motion. Pinching the catheter or covering the end with your thumb can prevent any remaining drops of urine from spilling as you remove it.
- Dispose of Supplies: Dispose of the single-use catheter and any wipes in the trash. Do not flush catheters down the toilet, as this can cause severe plumbing issues. Wash the urine collection container if you used one.
- Final Hygiene: Wash your hands again thoroughly with soap and water. If you retracted your foreskin, remember to gently return it to its natural position.
Understanding Why a Catheter Might Be Needed
Using a catheter at home is typically prescribed by a doctor to address a condition known as urinary retention, where the bladder does not empty completely or at all. This isn't just a matter of discomfort; leftover urine in the bladder can lead to serious health issues, including bladder distention, kidney damage, and recurrent urinary tract infections. Understanding the underlying cause can help individuals better manage their condition and adhere to their catheterization schedule.
Several medical conditions can lead to the need for self-catheterization. One of the most common in men is Benign Prostatic Hyperplasia (BPH), or an enlarged prostate. As the prostate gland grows, it can squeeze the urethra and obstruct the flow of urine. Other causes include nerve damage resulting from spinal cord injuries, multiple sclerosis (MS), or diabetes, which can interfere with the signals between the brain and the bladder. Post-surgery recovery, particularly after prostate or bladder surgery, may also temporarily require catheter use to allow the area to heal properly.
Common Questions and Related Topics
As you adjust to life with a catheter, other questions and concerns will naturally arise. Here are a few common topics that many people wonder about.
What Are the Different Types of Male Catheters?
While this guide focuses on intermittent catheters, it's helpful to know about the other types your doctor might discuss. The three primary types are intermittent, indwelling (Foley), and external (condom) catheters. Intermittent catheters are the most common for self-use; they are inserted to drain the bladder and then immediately removed, a process typically repeated 4-6 times per day.
An indwelling, or Foley, catheter is designed to be left in place for an extended period, from days to weeks. It is held in the bladder by a small, water-filled balloon and drains continuously into a collection bag. These are often used for individuals with limited mobility or after major surgery. Finally, an external or condom catheter is a non-invasive option. It consists of a sheath that fits over the penis like a condom, with a tube that connects to a drainage bag. This type is suitable for men who have urinary incontinence but do not have urinary retention, as it only collects leaking urine and does not drain the bladder directly.
How Can I Prevent Urinary Tract Infections (UTIs)?
The risk of developing a UTI is the most significant concern for catheter users. The urethra is normally a sterile environment, and introducing a foreign object, even a sterile one, can introduce bacteria. The single most effective prevention strategy is impeccable hygiene. Always wash your hands before and after the procedure and clean the genital area properly.
Beyond hygiene, staying well-hydrated is crucial. Drinking plenty of water helps to flush bacteria out of the bladder and urinary tract regularly. Additionally, never reuse single-use intermittent catheters unless specifically instructed by your doctor with a strict sterilization protocol. Reusing catheters greatly increases the risk of infection. If you experience symptoms of a UTI, such as cloudy or foul-smelling urine, a burning sensation, fever, or lower back pain, contact your healthcare provider immediately.
Conclusion
Learning how to use a male catheter at home is a skill that empowers you to manage your urinary health independently. While the process may feel clinical and awkward at first, it will become a quick and routine part of your day with practice. Always prioritize hygiene to minimize the risk of infection, and never hesitate to contact your healthcare team with any questions or concerns. Following their specific guidance and these general steps can help ensure the process is safe, comfortable, and effective.